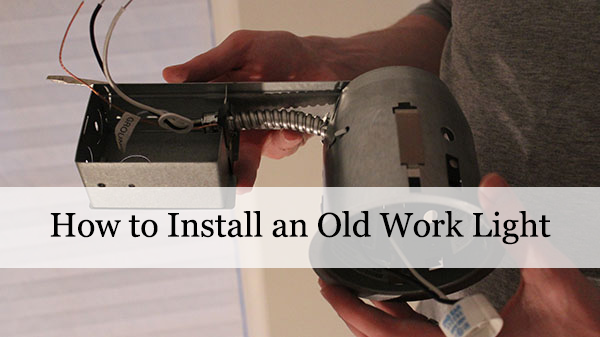
Finishing Up the Flat Screen TV

Share this post

So it’s been around a month or so since we started setting up our sitting room. We added a couch and finished hiding the HDMI cable now we’ve just finished up the work on the power cables for our flat screen TV. We really enjoy the space so far. It’s nice to have a place to hang out upstairs without being in bed.

Last time we left off on this project, I had run a power cable to the new outlet location.

hiding flat screen tv cablesSince then, I’ve had my work inspected and was cleared to device out the box. Instead of installing a typical outlet, I added a receptacle designed to accommodate the TV plug.

flat screen tv outletThe recessed outlet permits the plug end to avoid hitting the back of the TV. Here’s what the wall looks like now..

flat screen tv outlet 2Once the TV was back on the mount, I used a simple zip tie to keep the long TV power cord up and out of the way.

flat screen tv hiding powerAll done.

flat screen tv hiding power Before I started this little cable hiding project, I thought I could pull it off for around $30 as compared to the Powerbridge install we did at a neighbor’s house for $90.

Here are the rough material costs. I didn’t keep receipts.

  • HDMI Cable boxes (the orange ones in the wall) $8
  • HDMI Cover plate $14
  • Outlet box $4
  • Recessed outlet $13

That’s a total of about $39. Close. Now I didn’t include any tools or cable since I already owned them nor did I include the permit cost. The permit for the dining room outlet was only about $20. For some reason, the township charged me $60 for this one. I was expecting to pay $20. So, all told, I spent about as much as the Powerbridge. Oh well. In any case, this dual box approach is a little more flexible for smaller TVs compared to the one larger Powerbridge box.

So now we have to add some furniture. More on that next time ;)

Hiding a Flat Screen TV Power Cable

Share this post

Hey everybody!  Hope you all had a great weekend.  Lisa and I had a fairly busy couple days.  We picked a paint for our daughter’s bedroom and I started cutting it in.  We love the color.  I’m not sold on how it looks with the carpet quite yet, but we’ll see how it looks once the room is all setup and staged.

In other news, our permit to add an additional outlet behind our sitting room’s flat screen TV has been approved and I’m ready for our rough-in inspection.  In case you were wondering what the general process is for pulling an electrical permit..

1.  Plan work and come up with a rough estimate for the cost of the material.
2. Apply for electrical permit at local township office.
3. Receive go-ahead from local township or a call back for more info.
4. Do the rough-in work without adding any devices (switches, receptacles, etc)
5. Have rough-in inspected.
6. Device out (add outlet, switches)
7. Have finish work inspected.

We’re at step 4.  Here’s how it went.

Last time we posted, we cut the hole for the outlet behind the TV.

flat screen mount afterTo my delight, this interior wall happens to have studs that are 24″ on center (oc).

flat screen mount afterI was able to find the stud locations by tapping on the wall and using a stud finder.  I also popped off the phone jack and peaked into the wall space with a flashlight and a small mirror.  So, since there are no studs between the lower power outlet and the new outlet, I won’t have to remove any additional drywall.  I can simply “snake” the new cables from the lower box to the upper hole.

***ALWAYS DO ELECTRICAL WORK WITH THE POWER OFF AT THE BREAKER OR FUSE PANEL***

I remove the bottom outlet and snake the push the wire through the bottom box and up the wall.  The wire I’m using is stiff enough to get pushed fairly easily.

power tv cablesThe top hole will receive an electrical box specifically designed for renovation type work or walls that you don’t want to open up.

old work electrical boxThe box pushes into the wall and two screws are tightened, which flip tabs up that grab and squeeze the drywall.  Before the box is inserted however, the wire is run through the box.

old work electrical box instaWith the box firmly in the wall and the wire pulled through, the excess slack is cut off, leaving about 6″-7″ of wire hanging out of the box.

The new wire is then spliced into the bottom box’s wiring.  I’m not going to show that part. You can find a how-to on that part on YouTube.

So now we’re all set for the rough-in inspection!  Can’t wait to knock this out so I can get on with the sitting room furniture.

Wainscoting Painted

Share this post

I was originally thinking about skipping all the posts on our dining room wainscoting until we were completely finished with it. Staged and all. However, it may be another week until it’s all buttoned back up, so I think I’ll just get on with it and show everyone where we’re at.

The last couple weeks we’ve been painting. A lot. We finally finished painting the wainscoting and this past weekend we finished painting the walls. We had hoped to avoid repainting all the accessible beige, but the touch ups were pretty visible, so we ended up repainting ALL of it.

One tip I learned from painting the large panels of the wainscoting is definitely worth sharing. I was getting some major streaking or flashing with the semi-gloss on some panels. You can see the brush strokes. For some reason it just wasn’t going on evenly. It was driving me mad.

To remedy this problem, I just used a small roller and applied a nice even coat just to the MDF panels and then used a dry brush to flatten it out. Worked like a charm.

Yesterday, I started adding the outlets. Since they are situated in the MDF panel part of the wall, the boxes need to be extended by 3/4.”

I was able to find outlet extenders at Home Depot. They come in varying sizes (1/4″, 1/2″, etc) and can be screwed right onto the existing boxes.

When installed, it brings the receptacle flush to the wall.

Here’s some shots of the room. We still have to finish up a few more outlets and add the oak quarter rounds to tie the walls to the floors. Then we’ll need to clean up and bring everything back in.

Can’t wait to be done with this already!! Late last week we were in DC for a couple days, which is why we skipped out on posting. We’ll be sharing some of our experiences with that trip later this week.

Do any painting this weekend? What are you looking forward to finishing?

Hiding Flat Screen TV Cables

Share this post

So on Monday we shared our experience mounting a flat screen TV to a wall. Today, we’re going to show you how to hide the TV’s cables to get a totally sleek look. This is the second TV we’ve done this procedure to at Mike and Dana’s house and this version seemed to work better than the first, which used a slightly different product. In my opinion, this modification isn’t very difficult to do and can probably be done by anyone with a little bit of DIY experience.

We last left off with the TV hanging on the wall to test the bracket out. It had to come down in order to hide the wires. To hide these cables, Mike bought a Powerbridge from Best Buy. This device consists of two plastic boxes that get inserted into the wall. One will be located behind the TV and the other will go behind the TV stand. Between the two, the wires will be run in the wall for the power and whatever audio or visual cables are required.

In order to install these two Powerbridge boxes so you don’t see them, we need to make sure we’re putting it behind the footprint of the TV. Before we took the TV off the wall, we marked the perimeter of the TV with a couple of post-it notes. The boxes will need to stay within that area AND since the Powerbridge box is fairly large, it will need to sit roughly in the middle of the area between two wall studs.

We used those magnetic wall stud locators we discussed in our last post and then marked our wall with the wall template that was provided with the Powerbridge. We needed to mark the wall for both the top box and the bottom. The bottom was pretty much directly below the top box and low enough to be out of view behind the TV stand.

With the templates marked, Mike used a drywall saw to cut the openings for the boxes. You need to be careful whenever cutting into a wall so you don’t actually cut into a gas line or a power cable.

After the holes were cut, Mike inserted the top Powerbridge cable and fished it through the wall. This was apparently an exciting moment for him. The boxes stay in place by pop out wings that are tightened with screws. Very simple. Before we connected the bottom box, Mike pulled through a couple HDMI cables.

The power cable that comes with the Powerbridge is connected with a unique click together fastener. We actually needed to fix it before we made that connection as one of the wires was visibly detached, but that wasn’t very hard. After you snap the connector together, the cable slack gets stuffed into the wall and the bottom plate gets tightened to the drywall.

The photo above shows it all completed. The Powerbridge comes with an additional cable to plug into a nearby outlet that gets run to the bottom box.

All told, it took a little over an hour to get this project done. Mike and Dana really like the new look and Lisa and I are considering it for our family room at some point.

Any upgrades coming to your TV? Cut any holes in your walls lately?

***Full disclosure:  Lisa and I are members of Amazon.com associates.  If you purchase a Powerbridge, we get a small kickback.  If you’re interested in joining Amazon Associates, go to Affiliate-Program.Amazon.com ***

Ceiling Fan Installation

Share this post

We hope everyone is managing to stay cool during this little East Coast heat wave we’ve been having.  It was supposed to go up to 100 F yesterday!  I love the summer, but I’d rather be a little cool, than a little hot, ya know.  We have a blow-up pool we’ll be setting up for the baby, which I’m really looking forward to.

With this hot weather in mind, Lisa finally was able to talk me into installing a couple ceiling fans in our spare bedroom and the baby’s playroom.  The playroom isn’t quite where Lisa wants it yet, so a post on that room will be forthcoming, but not quite yet.  However, we can show you our guest room.

The bed is a queen sized MALM from Ikea.  I bought it for myself right after college.  It was a huge improvement after sleeping on a twin sized mattress on the floor of my fraternity house! After we got married, we kept this bed for a couple years, until we moved into our current house and bought a new one.  That’s also our bedspread we had when we first got married.  Actually the whole set it the from when we were first married.  I only had the bed, then we picked up the other two pieces.  I don’t believe they are from the same set, but, it’s white lacquer from Ikea, so it’s close.

I believe the dressers are from the same set, although I couldn’t name it off the top of my head.  Since they are only a few years old, they’ve held up fairly well.  You can probably tell that when we don’t have company over, this room is sort of a catch all.  We’re working on that a little at a time though.  That large carpet roll in the corner is the other half of the wall to wall carpet we had made into an area rug.  We haven’t decided on a paint color yet and since we haven’t even painted the master bedroom, the master bathroom, the powder room, etc… we aren’t planning on painting the guest room anytime soon!

The ceiling fan we’re installing is a Bellevue made by Harbor Breeze.  It’s a very simple five blade, white ceiling fan.  It’s the same fan that’s in the nursery.  We like it because it’s simple… it doesn’t require a lot of thinking or coordinating, it just works well with the rooms.

Installing these fans is a real breeze… (ba da ching).  Terrible pun, I know.  Sorry.  Actually, what makes this a lot easier, is when we built our house, we opted to put in a lighting box in each bedroom ceiling.  We had to pay a little extra for that option, but it means that we won’t have to fish wire through the ceiling or any of that nonsense.  If you’ve ever done that, you know it’s a PIA.  A little planning on our part saved us me a ton of time.

To install this fan, I used a basic set of tools that most homeowners should own (if you don’t own them yet, plan on getting them, trust me).  They are, from left to right: a pair of wire strippers, wire cutters, needle nose pliers, a current detector, electrical tape, a flat head and a phillip’s head screw driver.

I’m going to refer you to the directions included in the fan box for specifics on how to install a ceiling fan as I’m avoiding specific electrical instructions.  For ceiling fans, the gist of it is the number of conductors.  Ideally, you should have a black, a red, a white and a bare copper ground wire in your ceiling box.  If you don’t have the red wire, you’re probably going to have to relinquish control of the fan/lighting to the pull cords on the fan itself as you’ll only have use of one wall switch at that point.  If you have the additional red wire, then you can have  two wall switches; one for the fan and one for the light.

The body of the fan can be pretty awkward to hold up in the air while you try to wire it together.  For the guest room, I had Lisa hold it up, while I made the connections.  For the second fan, I just used some zip ties to hold the fan up.  It made it much, much easier.

The only part of this installation I truly hate is fastening the light to the ceiling.  The holes tend to not line up well for some reason.

It’s definitely worth any aggravation though!  This ceiling fan installation really helps keep the air moving upstairs even with central air conditioning.

So how are you beating the heat?