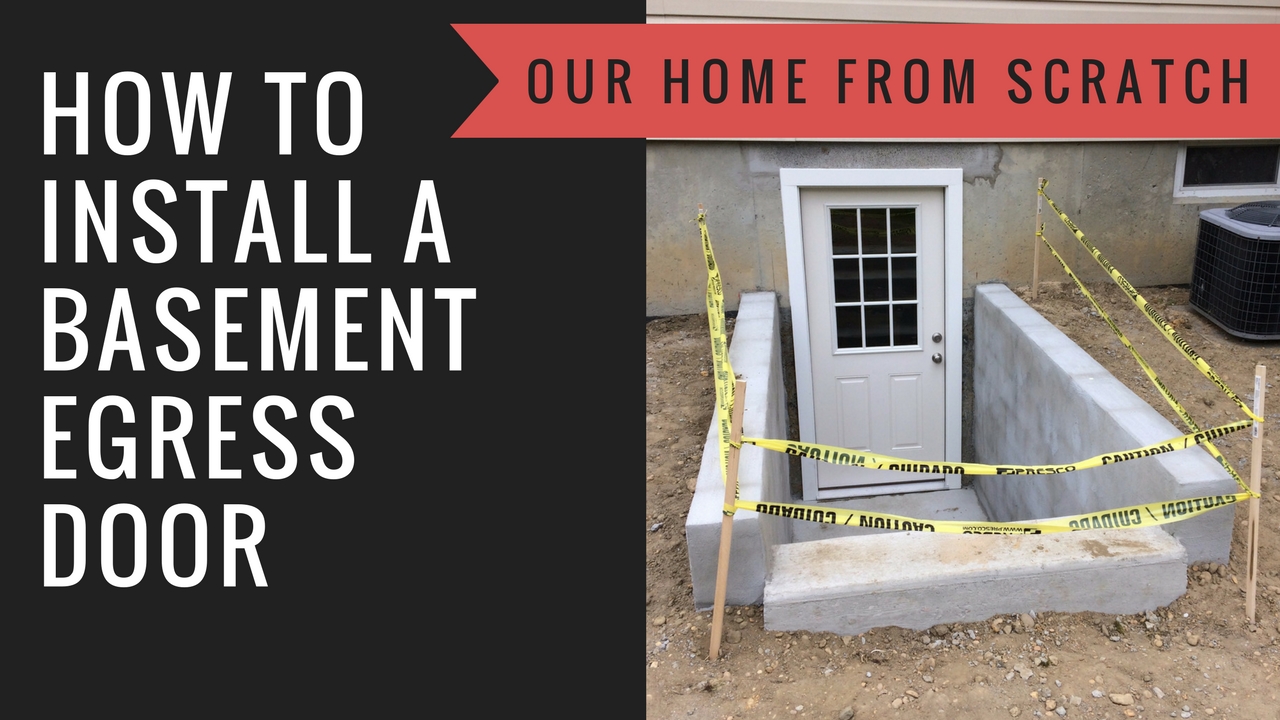
DIY Concrete Planter

Share this post

Happy Mother’s Day!  Hope you had a great holiday.  We pretty much hung out with our families all weekend.  Good stuff.  Good stuff.  Ate too much.

Today I wanted to bring you a quick how-to on making concrete planters.  Last week we shared the results of our attempt to make a monogrammed planter.  While we didn’t get exactly what we were shooting for with the monogram, the actual planter (sans monogram) looks pretty good.  We’re going to work on that monogram later, so stay tuned.  We’re going to get it right.

As for the planter, the directions I followed came from Popular Mechanics.  I used the exact dimensions they provided in their plans.  Their procedure, however, called for some different materials, which I opted to change for convenience.

Materials:

Popular Mechanics used a regular plywood board for the concrete forms that you seal or cover with aluminum foil.  It may have been MDF (I dunno, I actually didn’t read the article, I just looked at the pictures, lol).   So I used melamine.  When I made concrete countertops, that was done using melamine for the forms.  It’s what the concrete counter people recommend.  If you’re not familiar with melamine boards, they are just particle boards that are laminated with a hard, smooth, typically white layer of… something.  The white surface is impervious to water.  Melamine is usually used for either cabinets or shelving.  You can typically find it in the shelving isle at your local home improvement store.  It’s not expensive.  I used the 3/4″ thick stuff.

Concrete:

I used the 5000 psi mixture from Quikrete.  You can use a regular 80 lb bag of concrete too though.  Plan on one 80 lb bag of concrete per planter of the size in the article.  The planter ends up being around 80 lbs when you’re done.  Concrete is cheap, btw, around $5 per 80 lb bag.

Colorant:

Quikrete makes a colorant you can add to the concrete mixture to change the color.  If you don’t color it, it will end up being the same color as a sidewalk.  Nothing wrong with that, if that’s what you’re shooting for.  We used a half bottle of the black colorant for our planter and it’s not that black.  You add the colorant to the water before you add it to the concrete.

Tools you’ll need:

1. Drill and screws
2. Silicone caulk
3. Circular saw or table saw

To start, you cut all the melamine pieces for the form.  The form pieces are listed in the article.  I added the V letter to the board that’s the front of the planter.  I calked it to the melamine and then caulked around the perimeter of the letter.

monogrammed concrete planter 1monommonogrammed concrete planter 2

monogrammed concrete planter 3You basically make two planter boxes for the form, an inner and an outer.  The outer is where the letter goes, if you’re adding one.  As I assembled it, I applied a bead of silicone caulk to all the exposed edges of the melamine to keep the particle board from soaking it in and expanding.  I also applied silicone caulk to any joint where to melamine boards met to keep any liquid concrete from running through the seams.  All the boxes were joined with either nails or drywall screws.

The inner box gets mounted to a larger board.

concrete planter mold With the smaller box mounted to the bottom board, I place the outer box over the assembly.

concrete planter mold 2Before adding the concrete, I coated three small wooden dowels in vaseline.  They will serve as forms for the drip holes in the bottom of the planter.  You don’t need to nail them or anything.  Actually, they get smushed down into the concrete after you’ve poured it and can be taken out before the concrete fully sets.

concrete moldIn case you were wondering, you pour this planter upside down.  You need to work the concrete into the form with a stick or some other type of hand tool.  A stick works fine though.  Obviously, if you’re adding some sort of severe letter, you need to do a better job than I did with the concrete around the letter.

With the concrete in the form.  I used a random orbital sander pressed against the form to shake the air bubbles out of the concrete.

concrete planter mold 3I let the concrete cure overnight and then just started popping the sides off the form with a crow bar and a hammer.  The article makes it seem like you can just pull the inner form out from the outer form.  Yeah, good luck with that.

concrete planter 4After banging all the form pieces off, you’re left with the planter.

DIY concrete planterSo, lessons learned:

  • The melamine boards were difficult to remove and seemed pretty firmly stuck in there.  The article used a different material than melamine and talked about aluminum foil.  The hardest part was removing the inner form.
  • The black dye only gave us a dark grey planter.  If you wanted it darker than that, use more than half the bottle per bag of concrete
  • I should’ve coated the letter with either cooking spray or vaseline.
  • Don’t come into the house covered with concrete and sawdust and ask your wife for vaseline for the wooden dowels.  She’ll think you’re being weird.

How much did this cost?  About $35.  That’s not bad though.  I’m pretty sure store-bought concrete planters are expensive.  Plus, if you’re able to customize the size or add some personalization, you’ll be saving booko bucks.

So what do you think… is this something you’d attempt?


Pinterest Challenge: Monogrammed Concrete Planter

Share this post

It’s Pinterest Challenge Day everybody!  It’s like “show and tell” for bloggers… times ten.  Since the weather has been getting warmer, the yard has been on our minds more often lately.  What better way to kick off our outdoor season than with garden style Pinterest Challenge project.  We attempted a somewhat ambitious project and decided to make a monogrammed concrete planter.

Here’s one of the pins that inspired this project..

lowes concrete planter(via Lowes)

We already had SOME experience with concrete when we made those concrete counters way back in 2007.  This planter was a little different than the counters though.  It was considerably easier, but the approach was the roughly same.  I found a basic procedure on Popular Mechanics website that I followed dimensionally, but I used some different material.

Here’s what the form looked like with the concrete poured.  We’re going to do a full-blown “how-to” post or at least a lessons learned post on this (probably next week), but today we’re just doing an overview.

concrete planter formAfter the concrete cured, I popped the planter out of the form and here’s what we have.

black concrete planterIt looks pretty good dry and it looks sick when it’s wet.

But hang on… wasn’t this supposed to be monogrammed?

We DID monogram it.  On one side.

But, that part didn’t come out as hot.  We used a metal “V” from Restoration Hardware, which is the initial of our last name.  The idea is we’ll have two of these on our front porch with a small green plant of some type.  Very personal.  Very unique.

monomonogrammed concrete planterSo the concrete didn’t fully settle into the form around the “V”, obviously.  The worst part is, I was hoping to be able to pop out the V and use it on the next one.  Thought it would look pretty cool as a relief.  We also wanted to make one to see how it worked and make a matching one later.  Now I can’t get the letter out! LOL!

Did I mention that’s the only V I had and Restoration Hardware doesn’t sell anymore!  Whoops.

monogrammed concreteOh well.  Still looks cool though.  Weighs about 80 lbs.

So, when I make the next one… I’m going to take some extra concrete and fill in that space near the V so this one won’t look weird.

In the meantime, we’re going to turn the one planter around and stick with the solid side ;)   So it’s not a total loss.  Fun project.

Oh and we decided to wait to on the plant until we’ve got both built and ready to go.

DIY concrete planterHere’s a link to our last Pinterest Challenge Project, the Reclaimed Wood Frame with a map.

So, here’s the rundown on the Pinterest Challenge.  It’s hosted by four bloggers.. this season it’s…

Katie from Bower Power
Sherry from Young House Love
Emily from Sparkle Meets Pop
Renee from Red Bird Blue

So pop on over to their blogs and check out all the projects!  We’ll be back on Monday!

My Experience with Concrete Countertops

Share this post

Hope everyone had a Happy Easter!!  Ours was filled with great family and great ham!  So great in fact, that we skipped our normal Monday post to sleep in!!

Thankfully, this post isn’t about another project that Lisa and I are starting.  It’s about one we finished quite some time ago.  I’ve been itching to post about concrete countertops since I started blogging, but I finally got around to taking some new photos and digging up some old photos from the project.

Way back in the summer of 2007, my family and I were renovating a new-to-us vacation home a few miles from the Beach in the Jersey Shore.  In retrospect, the whole endeavor may not have been the best idea at the time as my father was very sick with his stomach cancer and the house ended up being a giant burden in those days.  We had hoped it would keep him busy with small projects and for the most part it was a success in that regard.  I’ll post more on the before and afters of the house later this week, but I thought I’d start with the counters.

On top of all the projects, we were trying to stretch out the budget and needed new countertops.  So, granite countertops weren’t exactly in the cards.  I had seen some cheaper options for DIY solid surface counters like soapstone and concrete, but hadn’t had any prior experience.  Then after a discussion with a co-worker who was also considering concrete, he let me borrow a Fu Tung Cheng How-to DVD and I was sold.

My folks were initially reluctant, but then after I told them I’d be able to get the counters in for only a few hundred bucks, they were okay with the project.  I immediately started ordering supplies and got to planning.

For those not familiar with the Fu Tung Cheng method, you basically make reverse molds of the counters out of melamine, pour in the concrete and then install the cured counters like granite.  You use regular store bought concrete bags and add some colorant and strengthener.  The hardest part is building the forms.  I don’t want to rehash the instructions, just share some of my pointers.  The DVD is a necessity if you’re thinking about attempting this and the book is informative as well.

Back in 2007…

Here they are today…

Concrete has a lot of imperfections and it’s prone to some small cracking, but that’s part of the character.  If you’re considering a concrete for your counters, here’s what you need to consider.

1.  Your molds need to be very accurate and dead flat and even.  If your mold is slightly bent or crooked, the concrete will imitate that as it cures.  The molds can bend under the weight of the concrete as well, so it needs to be done on a sturdy table and not two saw horses like I used.  If the mold sags down, when flipped over, the concrete will have a curve upward.

2.  You’ll need some specialty tools: wet grinder, cement mixer, cement vibrator, good quality table saw.  I wouldn’t used a hobby table saw as it’s too hard to cut 4×8 sheets of melamine for the molds.

3.  You will make a huge mess, so either do the project outside or use tarps inside.  Better grind outside though.

4.  When you design your counters, thicker looks better.  We chose ours to be 1.5″ to get the look of a granite counter, but we would’ve probably been better off with a 2″.  The advantage of concrete is that you can get whatever you want.

5.  Your cabinets need to be able to take the weight of the material. You may need to reinforce your cabinets to prevent them from buckling or breaking.

6.  You need to design your counter into sections.  If your countertop is going to have a long section and it’s going to be 2″ thick, you’re going to need more than a few people to help you lift it.  I’ve included a concrete countertop weight estimator here.  That sink section shown above took about four people to lift and install and it was only 1.5″ thick AND was missing the sink hole!!  DO NOT think you can make a huge counter 3″ thick and you’ll be able to throw it on yourself.  The longer the counter, the more prone it is to warpage and cracking.  Small sections are better the thicker you go.

7.  When you transition from one piece to the next, try to make the junction as sharp as possible.  If you use the melamine form method, you caulk all your seams before you pour the concrete.  The thicker the caulk application, the more rounded your edges will be when you add the concrete.  Try to minimize the curvature, i.e., the amount of caulk you use where one counter meets another.  You don’t want to butt two counters up against each other and have two big, rounded corners.  You want a sharp transition.

It won’t turn out perfect, but that’s okay… it’s even part of the look.  It’s not supposed to look like granite or soapstone. Plus, you can save huge $$ and have a great time if you’re up to the task.  Just be warned, it’s not as easy as it looks!!