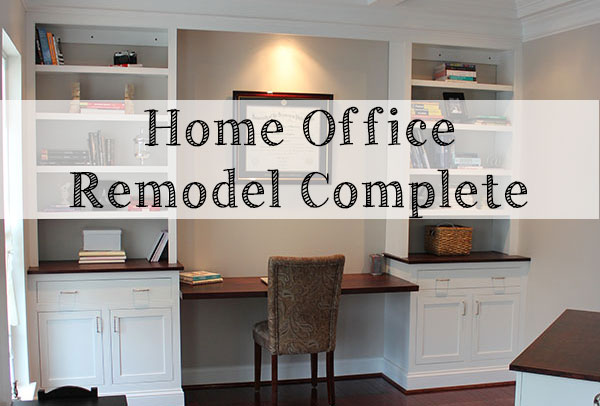
Building Face Frames

Share this post

Very happy to be building face frames back in the workshop, aka my basement!  To bring you up to speed, so far we picked an overall look of the design we want.  We then dimensioned the design based on where we’d like it and discussed the whole build process.  Next we designed the face frames and now, we’re set to build them.

Quick update first:  We made a small design change.  The built-in was going to be too wide so we shrank the width down by a foot.  The height stays the same.  No big deal.  I’ll explain why when we’re all done.  Hopefully it will be obvious in the end.  If you were following along, the only changes were to the horizontal boards.  Instead of being 55″, now they’re 43″, a foot shorter.

From the face frame design drawings, I made a shopping and cut list (all thicknesses below are 3/4″).

Bottom face frame:
1.5″ wide x 34.25″ long -2 of them
2″ wide x 43″ long -1 of them
2.5″ wide x 43″ long -1 of them

Top Face Frame:
1.5″ wide x 57 3/8″ long -2 of them
2.5″ wide x 43″ long -1 of them

I bought all the lumber at Lowes.  Poplar is very common and you should be able to get it just about anywhere.  I tried to be economical here and bought the lowest price boards I could.  The longer and wider, the more expensive.  Also, to eliminate the need to use the table saw, I chose and bought boards that are already at the necessary widths (1.5″ and 2.5″).  The 2″ wide board needed to be trimmed down from 2.5″, which is one quick pass on the table saw.

poplar boardsNow onto the real cutting!

First thing.  You’ll need at least a basic miter saw.  Can you do this sort of thing with a hand held circular saw?  Maybe.  But it’d be really hard.  The saw blade is also important.  You want a saw blade with at least 40 teeth.  The higher the tooth count, the better.  Don’t use a saw blade with 24 teeth.  They’re great for cutting 2x4s for framing walls, but they cause major tear outs in hardwood.  Higher teeth count blades give you cleaner, crisper cuts.  They’re not much more $$ than the basic blades either, maybe $20-$30.  Worth the investment.

60 tooth saw bladeSo, in both our top face frame and our bottom face frame, we have two vertical pieces that are exactly the same length.  To make sure we cut them to the same length, we’re going to cut them together.  How do I do that?  I clamp them together.  And I tape them.

miter sawThe first cut is to clean up one of the ends.  I like to take just a hair off one side because the ends of the pieces are a bit tattered and split from transit and hanging out in the store for months or weeks at a time.  The next photo is a picture of what they look like before the clean up cut so you can see what I mean.  They don’t look too bad in the photo, but they look waaaayyy better after that first trim.

board endsNow that one end is clamped up, clean up and cut together, I can measure, mark and make the second cut.  I use a regular tape measure and make a small pencil mark on the length I need (ignore the fact that 35″ isn’t an actual required cut).

marking boardsWith the pencil marks down, I use a speed square, flush it up to the edge of the board and line up the other edge of the square with the pencil marks.  Then I use a box cutter to go over the pencil marks, essentially making a super thin line.

marking the cutI prefer this sharp line for this type of work because it’s thin and well defined.  A fat pen or pencil mark can be deceiving.  This one is dead on.

Now I line up the edge of the saw blade with the cut mark I just made.  You don’t want to cut through the middle of the mark, you want to cut just next to it.  You want that box cutter mark to be whisker thin after you make your miter cut.

cutting boardsLining up the box cutter line with the edge of the saw blade can take a few seconds and requires some patience to get it right, but it’s worth it.  Your cut will be dead accurate.  Now I just repeat this process for the remaining cuts.  Again, keep boards clamped together that have the same length and you’ll get a perfect match.

boards readyWith all the boards cut to length, I pick out the boards for the bottom face frame and lay them out on the work table how they’ll be assembled.

bottom face frameI inspect each board superficially for defects.  I want the better side to be facing forward when this piece is done.  The better side gets turned over and I drill my pocket screw holes in the back of the two horizontal rail pieces.

pocket holesAfter both boards are drilled, I add a little wood glue on the end of the horizontal rails and screw the rails to the stiles.  I placed a board underneath the two I’m joining just to make sure the table is flat while clamped.  My table top tends to move a little (oops).

pocket screwsI repeat this joint in three other locations and the bottom face frame is assembled.

bottom built-inThe top went together fairly easy as well.

top face frameNot too bad.  It took me about an hour to throw these together.

Next up will be the doors.  I’ll need to add a center divider in the bottom face frame too.  Definitely going to try to make a video for the doors.  Any questions?


Our Hemnes Toddler Bedroom

Share this post

Hey there cats and kittens (bonus points if you know who says that phrase every week)!!  Hope everyone got enough sleep after that thrilling Super Bowl.  Wow.  We had a pretty busy weekend, but still managed to knock off a few minor projects off our to-do list.  Saturday we had a family party for our daughter’s 2nd birthday.  We’ll be sharing some pictures later this week.  More importantly though, I thought we should bring you up to speed on the whole we’re having a second baby thing.

So, we’ve known since August that we were growing our family but we put off making an announcement on the blog.  We talked about taking a picture with Sherry and John from the signing, which of course we’d post, and we knew Lisa would be visibly pregnant.  So, we thought that would be a fun opportunity.  Since Christmas, the biggest home related decision we’ve had to make regarding the new baby is what we’re doing about the bedrooms.  Do we re-use the nursery and move our daughter into a new bedroom or do we make a new nursery?  You obviously know the answer to this one by now, but it took us a while to finally make that decision.  It’s not easy moving your first child out of their nursery.  They grow up so fast.

Anyway, that’s some background on our whole bedroom deal.  Our daughter helped by jumping out of her crib fairly early thus necessitating some action.

Since we already owned a couple white Hemnes pieces, we thought it might be easier to just pickup a matching twin bed and go from there.  We looked at toddler sized beds as well, but it seems like a better investment to just stick with the twin bed.

Here’s what her bedroom looks like now..

Keep in mind we still have to do a good deal more decorating.  Lisa has a laundry list of ideas that we’ll work through over the next few weeks.

hemnes toddler bedroomLisa’s parents picked up the comforter and cupcake sheets at Home Goods.  Thanks Mom and Dad!

hemnes toddler bedroom 3Lisa and her mom are also big Scotty fans.  They also grabbed this Scotty bookend at Home Goods.

scottish terrier bookendThe wall opposite the bed is completely blank.  We have a few ideas for the room as I mentioned, but nothing nailed down yet.  It’s a big wall.  We’ll see.

hemnes toddler bedroomAnyone else wish they had President’s Day celebrated today?


Our Master Bedroom and Sitting Room

Share this post

Two posts in a row!  Talk about a New Years resolution.  It’s like going to the gym everyday for a week… that’s what two posts in a row is like… at least in my head.  I haven’t been to the gym since around 2005.  It’s been 7 years.  I was 26.  Wow.  Anywho, about our master bedroom and sitting room.

As I mentioned in our 2013 To-Do list, we’re planning on making use of this sitting room that’s attached to our master bedroom.  I don’t think it would be proper to just show you the sitting room, so we’ll show you both.

***Remember, we haven’t done ANYTHING to these rooms other than throw in some furniture.  They need paint, decorating, the works.  Also, I hate decorating.***

Here’s the first thing you see when you come up our stairs…

master bedroom 2Is it normally that cleaned and freshly vacuumed?  Um… yes (no).   I picked a crappy day to take these photos.  It was heavily overcast even during the normally bright hours, so I had to use the overhead and room lights, which washes the room over in a warm amber glow.  If you’ve tried to take interior photos at night, you know what I’m talking about.  Oh well.  It is what it is.

Moving into the room…

master bedroomWe have our bed.. it’s king sized.  I would make a crack about being a king or something, but if you’re married and have a schnauzer you need all the room you can get.

This entire furniture set came from Mealey’s.  It’s held up well.  Nice stuff.  The carpet, not so much.

Lisa’s dresser…

woman's dresserMy “gentleman’s chest” … thankfully they didn’t make me provide references or otherwise prove I’m a gentleman in order to purchase it.

gentlemen's chestIf I’m not careful, several t-shirts will roll out onto the floor when I open the side door.  It’s like a spring loaded peanut butter brittle can.  Stuff pops out.  I need to add a system to this thing.  Not high on our list, but on the list nonetheless.

Moving onto the sitting room…

sitting room 2It’s actually a decent sized room.  We’ve yet to do any actual “sitting” in said room, but we are planning on it.

There’s a nice sized long wall where we’ll put a couch…

sitting room 3and a smaller wall opposite it where we can hang a flat screen and a TV console.

sitting roomWe’ve actually already bought a couch for this space from Ikea and we’re using an older flat screen we have from our first home.  I’ll be doing a couple posts on hiding the TV’s cables using a slightly different method than the Powerbridge we used at our neighbor’s house as well.  Beyond that we need a TV console which we haven’t picked out, lighting and ideally some built-in shelving.  Hopefully painting this space will carry over into the rest of the master.

Remind me never to take pictures in this room with those lights on again please.  It’s giving me a headache.

What’s your first project of 2013?

Ceiling Fan Installation

Share this post

We hope everyone is managing to stay cool during this little East Coast heat wave we’ve been having.  It was supposed to go up to 100 F yesterday!  I love the summer, but I’d rather be a little cool, than a little hot, ya know.  We have a blow-up pool we’ll be setting up for the baby, which I’m really looking forward to.

With this hot weather in mind, Lisa finally was able to talk me into installing a couple ceiling fans in our spare bedroom and the baby’s playroom.  The playroom isn’t quite where Lisa wants it yet, so a post on that room will be forthcoming, but not quite yet.  However, we can show you our guest room.

The bed is a queen sized MALM from Ikea.  I bought it for myself right after college.  It was a huge improvement after sleeping on a twin sized mattress on the floor of my fraternity house! After we got married, we kept this bed for a couple years, until we moved into our current house and bought a new one.  That’s also our bedspread we had when we first got married.  Actually the whole set it the from when we were first married.  I only had the bed, then we picked up the other two pieces.  I don’t believe they are from the same set, but, it’s white lacquer from Ikea, so it’s close.

I believe the dressers are from the same set, although I couldn’t name it off the top of my head.  Since they are only a few years old, they’ve held up fairly well.  You can probably tell that when we don’t have company over, this room is sort of a catch all.  We’re working on that a little at a time though.  That large carpet roll in the corner is the other half of the wall to wall carpet we had made into an area rug.  We haven’t decided on a paint color yet and since we haven’t even painted the master bedroom, the master bathroom, the powder room, etc… we aren’t planning on painting the guest room anytime soon!

The ceiling fan we’re installing is a Bellevue made by Harbor Breeze.  It’s a very simple five blade, white ceiling fan.  It’s the same fan that’s in the nursery.  We like it because it’s simple… it doesn’t require a lot of thinking or coordinating, it just works well with the rooms.

Installing these fans is a real breeze… (ba da ching).  Terrible pun, I know.  Sorry.  Actually, what makes this a lot easier, is when we built our house, we opted to put in a lighting box in each bedroom ceiling.  We had to pay a little extra for that option, but it means that we won’t have to fish wire through the ceiling or any of that nonsense.  If you’ve ever done that, you know it’s a PIA.  A little planning on our part saved us me a ton of time.

To install this fan, I used a basic set of tools that most homeowners should own (if you don’t own them yet, plan on getting them, trust me).  They are, from left to right: a pair of wire strippers, wire cutters, needle nose pliers, a current detector, electrical tape, a flat head and a phillip’s head screw driver.

I’m going to refer you to the directions included in the fan box for specifics on how to install a ceiling fan as I’m avoiding specific electrical instructions.  For ceiling fans, the gist of it is the number of conductors.  Ideally, you should have a black, a red, a white and a bare copper ground wire in your ceiling box.  If you don’t have the red wire, you’re probably going to have to relinquish control of the fan/lighting to the pull cords on the fan itself as you’ll only have use of one wall switch at that point.  If you have the additional red wire, then you can have  two wall switches; one for the fan and one for the light.

The body of the fan can be pretty awkward to hold up in the air while you try to wire it together.  For the guest room, I had Lisa hold it up, while I made the connections.  For the second fan, I just used some zip ties to hold the fan up.  It made it much, much easier.

The only part of this installation I truly hate is fastening the light to the ceiling.  The holes tend to not line up well for some reason.

It’s definitely worth any aggravation though!  This ceiling fan installation really helps keep the air moving upstairs even with central air conditioning.

So how are you beating the heat? 


The Rest of the Shore House

Share this post

As promised in yesterday’s countertop post, here’s the rest of the before and after photos from our shore house renovation.  Keep in mind that most of the before photos are kinda crappy in quality because we weren’t really thinking we’d be putting them on the web one day.

I’ll start where I left off yesterday… in the kitchen.  This is obviously the before.  The floors were stained.  The look was dated.

We removed the cabinets and painted them.  To do that, we cleaned them really, really well first.  Then we applied some deglosser so the primer would adhere.  They were then spray primed with a BIN primer I bought at Lowes.  The finish coats were a furniture grade white lacquer, which was followed up with a couple coats of clear.  It was like painting a car.  I used a different technique for painting the cabinets in my first home, which occurred after these shore cabinets.  We also ripped out the linoleum flooring and put in hardwood.  The soffits were taken down as well as the cabinets under the peninsula.

Current view…

The mini pendant lights I believe are from Kichler, but these would probably be the closest match today.  The peninsula is made from poplar 1x4s and turned legs from Osborne Wood Products.  I whipped it together using a beaded router bit and a couple mortises made from my crappy drill press turned mortise machine.

The dining room faces the kitchen and it was also in need of a face lift… I should just save myself the time and say the entire house needed a lot of cosmetic work and why do these five year old photos look like they were taken in 1977?

You may notice that we put the hardwood throughout the house except the bathrooms and bedrooms.  We also ripped out the old baseboard heater and added a central heating furnace. That was an adventure!

The family room was pretty heinous.

Every surface need to be washed, painted or replaced.  There was a good deal of discoloration from years of smoking by the prior occupants.  We used this room to stage all of our supplies during the renovation.

Check out this bedroom…

Kinda random.  That chair looked pretty creepy from down the hall too…

Here’s that bedroom today…

Another bedroom…

The “Flip-Flop” room…

So that’s our near-the-shore house.  It took a ton of work to get to where it is today.  Can you believe it’s Wednesday already!  Anything fun planned for the weekend?