
This past Tuesday, the Philadelphia Region was slammed with a windy summer storm that knocked out our neighborhood’s electricity for days. We were without power until this past Saturday. No fun. Since we moved here from the city five years ago, we’ve lost our power maybe once a year and for never longer than a […]

Most of the home improvement projects I’ve done around our home are one-time savings events. I’m doing the work once and saving money over hiring a contractor one time. There are a few projects, however, that continue to save me money even though I finished them years ago. In this post, I’ll share with you three […]
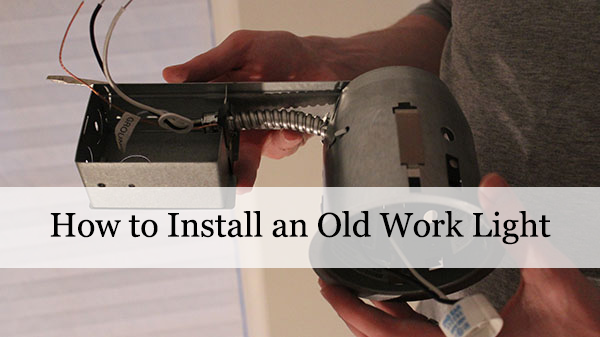
Our home office remodel is going really well. We just finished the joint compound work, the ceiling has been primed and painted and just this evening I finished installing the ceiling lights. I just realized I owe you a complete list of every task we’ve completed and have planned for this space, that way you […]

Just this morning, my local township electrical inspector stopped by and reviewed the electrical work I had performed for our home office improvement project. He gave us a passing grade, which means I officially have approval to cover the framing with drywall and finish the room. He pointed out a couple changes I need to […]
In this post, you’ll learn – How to use chalk lines to mark for center – How a compass and a drywall saw are used for ceiling light holes Late last week, I got a call from our local township that our electrical permit was approved. Right after I picked it up, I got started. […]
We hope all of our American friends had a safe and enjoyable Labor Day! Our weekend was filled with family visits and some much needed down time. Today we’re going to show you how we finished up our new garage outlet and how we added a workbench charging station. Let’s start with the garage outlet. […]
When we built our home back in 2010, we had the option of adding as many additional electrical outlets as we wanted among some other bells and whistles. Code requires a minimum number per so many feet, but any more than that bare requirement came out of our pocket. In retrospect we probably should’ve added […]
So it’s been around a month or so since we started setting up our sitting room. We added a couch and finished hiding the HDMI cable now we’ve just finished up the work on the power cables for our flat screen TV. We really enjoy the space so far. It’s nice to have a place […]
Hey everybody! Hope you all had a great weekend. Lisa and I had a fairly busy couple days. We picked a paint for our daughter’s bedroom and I started cutting it in. We love the color. I’m not sold on how it looks with the carpet quite yet, but we’ll see how it looks once […]
Hey guys! Hope you’re all doing well. We had another not so productive weekend, only got a couple small things done. Small steps though, right? This week, I’m hoping to get to fix some cancerous rust on my Jeep and maybe get some more work on the garage shoe rack. Yesterday I installed a light […]

