
Today we’re exited to bring you another edition of Your Home from Scratch. If this is your first time to our site, Your Home from Scratch is a new series where we interview our readers and other bloggers to bring you their challenging home improvement projects. Last week in our first Your Home from Scratch post we interviewed Katie from Addicted 2 DIY. Today we’re talking to Colette from Moving to the Country about her new deck, which her and her family built from scratch.
What makes this project extra interesting for Lisa and I is Colette and her husband have nearly the exact same home as we do. We both own Courtland models from Ryan Homes, although we live in different towns. So Colette’s deck project is the perfect primer for our outdoor plans.
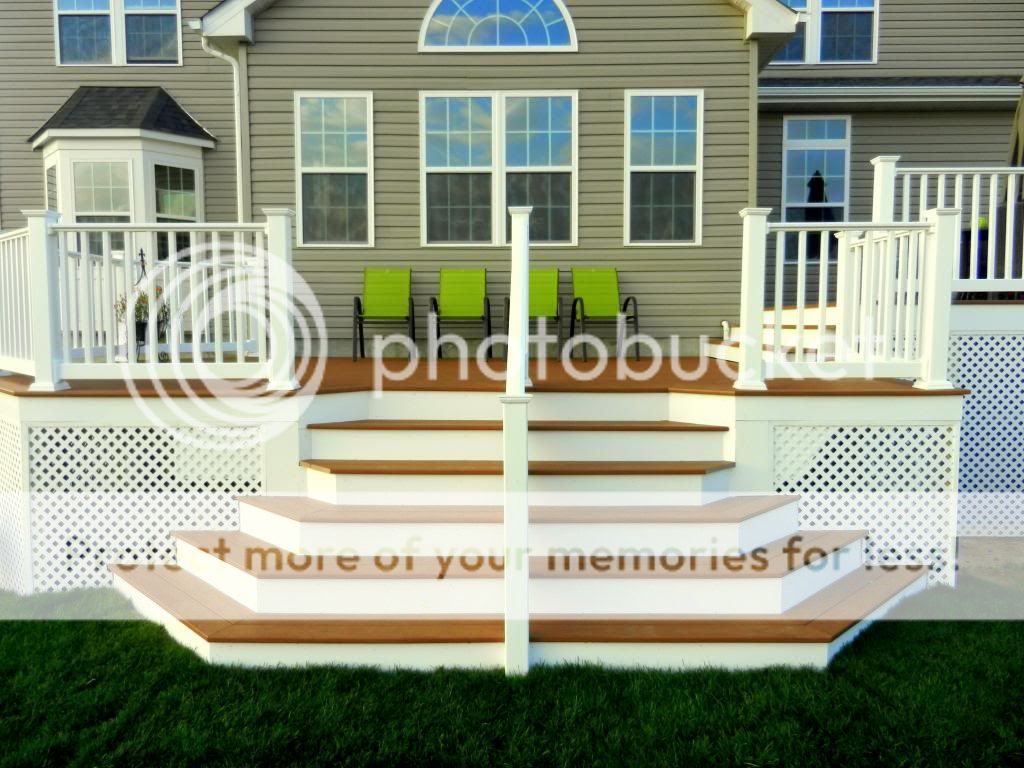
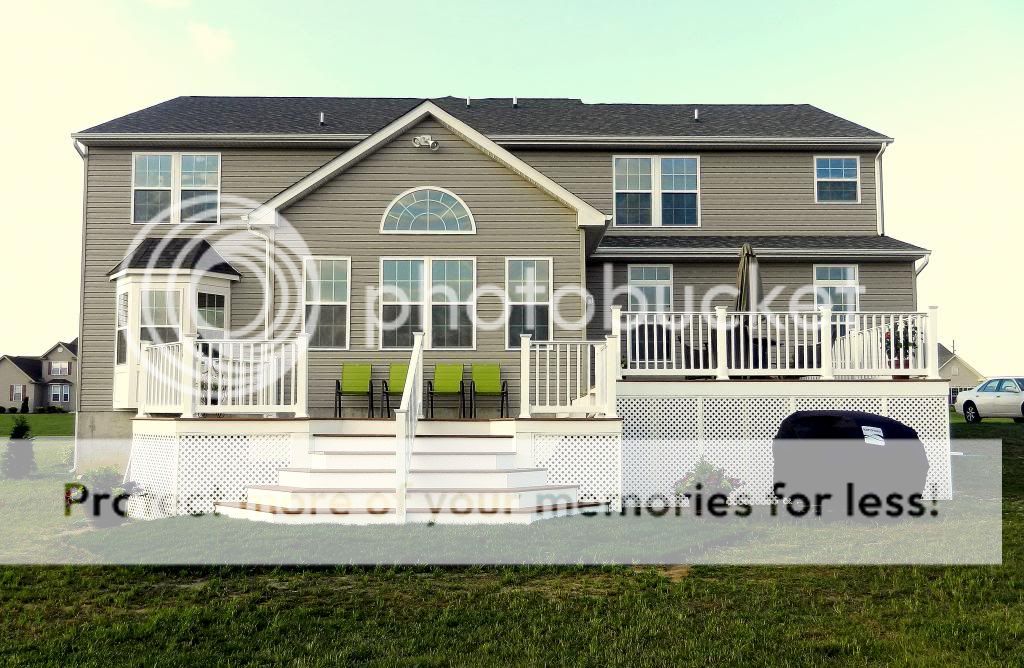
Colette’s Amazing Deck
Q1. Your deck is pretty sweet. How long did it take to build from start to finish?
In terms of chronological time, it took us about six months from start to finish. However, we took off for three months over the winter and only worked (some) weekends. We had the footings poured by a contractor, then the framing took us about 5 full days to complete. Then the drainage system, laying of the floor boards, railings, fascia and lattice took us about 5 weekends to complete. The “wedding cake steps” took an entire weekend themselves to build (but it was totally worth it!). The finishing touches actually are still not finished. We still need finish some trim pieces around the steps and storage area. Why does it always seem so hard to finish that last 1% of a project?? (You can see the final product with links to all of our status updates here).
Q2. How much money did you save building the deck yourself?
I estimate that we saved between $6,000 and $10,000 by building it ourselves. Our builder was charging $11,800 for a 250 sf deck. If you apply that square-foot price to our 480 square foot deck, it comes out to about $22,500 and it cost us about $12,000. (You can find a complete cost breakdown of our materials here). I should also note that we used much higher quality materials than the builder was offering. I’m sure a contractor could have done it cheaper than our builder, but I would be willing to bet it still wouldn’t be close to what we spent. Outdoor living is expensive!

Q3. How did you decide on the layout and the two level configuration?
The layout we ultimately decided on was the 7th option I came up with (I can be indecisive with big decisions). I looked at a lot of pictures online, and I knew I wanted two separate areas… one for dining and one for relaxing. The reason for the two-level configuration was all based on the cascading steps, which were a must-have in my design from the start. Because of how high our back door was from the ground (about 8 feet), if we didn’t add the lower level we would have needed too many of the cascading steps to meet the ground and they would have been too wide for the front face of the deck. By lowering the one section of the deck, we were able to get the perfect amount of cascading steps. An unanticipated bonus of the two levels is that the wide steps between levels provides some extra seating when we have big crowds.
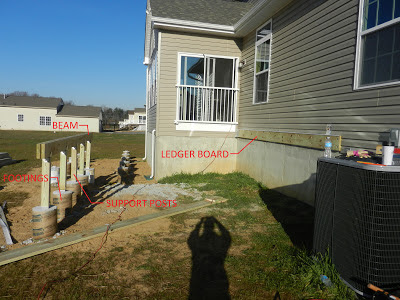
Q4. So the upper deck is attached to the house and the lower level is free standing? Why not attach both?
Two reasons: 1). We wanted to avoid having to drill into the concrete foundation of our house. The upper level ledger board attached directly to the wood base framing of the house, whereas the ledger board for the lower level would have had to attach to the foundation of the house. 2). We would have needed extra footings under the “bumped out” cantilevered part of the lower level anyway, so we decided just to pour a few more footings and make it free standing.

Q5. You ended up making use of the space below your upper deck for storage. How did you keep the water out? Was your solution pricey?
So glad we did this! The storage area under the upper level is big enough to store both of our lawnmowers and all of our outdoor furniture with room to spare. There are two main types of deck drainage systems: One is installed above the joists and the other is installed below the joists. We knew we wanted an “above joist” system to maximize our storage height. The two companies I found that sold this option were Trex Rain Escape and DekDrain. We chose DekDrain beacuse: 1). It was cheaper. It was about $1,000 for the whole system (for 240 sf). Trex Rain Escapes is a little more sophisticated, but we didn’t care about being fancy and were happy to save a few bucks. And 2). You cannot buy Trex products directly from Trex and the two authorized dealers I spoke with had no clue what materials were required or how to install them. Since we were first timers, I wanted to be sure we’d have adequate support if we ran into problems. When I called DekDrain for information, their rep was super-helpful. It helped that they were cheaper anyway, but I probably would have went with them even if they weren’t. In my opinion, you can’t put a price on good customer service!

Q6. What was the most difficult part of the build process?
After deciding on our final design (which took about 3 months), I would say the most difficult part was the cascading steps. We couldn’t use standard stringers so we had to cut about 15 custom stringers. There were a lot of calculations to get the right measurements and a lot of angle cuts because of the shape of steps. It was a very tedious process, but I think the cascading steps totally make the deck, so it was worth it. (It’s also easy for me to say that since my dad did most of the work on the steps 🙂 ).
Q7. Were there any setbacks or hiccups along the way that you didn’t plan? How did you get through them?
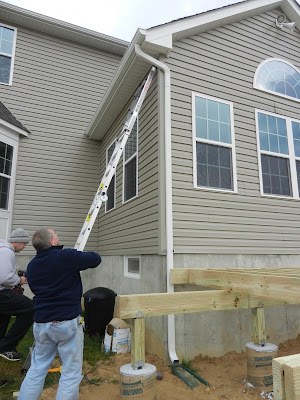
When we got to the framing for the lower level, we realized the our down spout would be in the way of our beam so we had to move it. It was not that difficult to do (you can see what we did here) and it was a very cheap fix, but it took us a few hours to complete so we lost some time there. If we had thought about it when we were building, we probably could have gotten them to put it in the right place to begin with. Our inspector was also pretty tough, but we just did the extra things he asked so we didn’t have any problems.
Q8. Are you interested in building our deck? 😉
Haha, sure!! Do you have plans to build one soon? In all seriousness, we’d be happy to help or answer any questions when you get to that point!
Thanks to Colette for her great answers. If you are interested in contributing your challenging DIY or home improvement project for Your Home from Scratch, you can use the Contact form to shoot me an email.
Have a great week!


