In this post, you’re going to learn:
– How your home improvement project is exactly like the space shuttle
– How to use the Home Remodeling Process for your next home improvement project
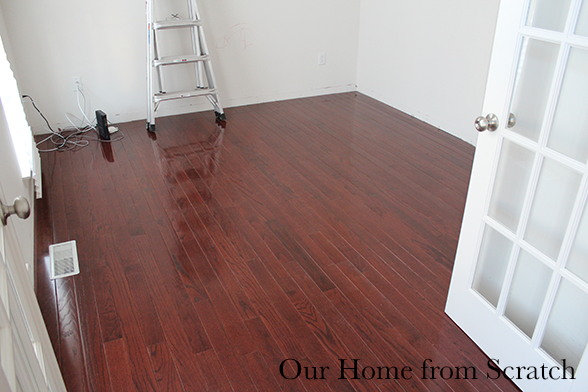
After another full weekend of labor and our home office floor is finally finished. Now it’s time to turn our attention to the remainder of the remodeling process. If you’ve never upgraded a house or even a room before and you’re not sure how to get from start to finish, this post should help. I’m going to borrow the design and build process from my engineering experience and give it a home improvement spin. You certainly don’t have to follow this process to get a quality result on your home project, but it may help you to map out the entire project so that you have less surprises.
The Home Remodeling Process
Ever wonder how people can build something so complex like a space shuttle or an ocean cruise liner? It not only takes talented engineers and enormous budgets, but a build process that designers can all follow throughout the project. The hull team needs to know the requirements of the propulsion team, the propulsion teams needs to know the requirements of the mission planners, the mission planners need to know the budget and the available talent and equipment. It gets complicated pretty quickly. Your home improvement projects, while considerably smaller in scale can benefit from following a similar process. If you’re renovating an entire house or doing a lot of work in one room that includes electrical, plumbing, framing, drywall or furniture building all rolled together, you’ll be much better off following some sort of build process.
In this post, I’m going to describe a basic, 3-step design and build process for home improvement enthusiasts that can be used on nearly every project.
The Home Remodeling Process starts with the Concept Development Stage, moves into the Detailed Design Stage and then finishes with the Build and Installation Stage. We are essentially moving from early ideas, to concrete plans to execution. Our home office project is still in the Concept Development Stage since we don’t have any concrete plans for furniture or room layout yet.

Let’s take each stage and do a quick breakdown.
Concept Development
This first stage is where you brainstorm. Spending hours on Pinterest during this stage is NOT a waste of time as you are getting a feel for what you want your home or room to look like when it’s finished. You also may be looking through magazines or making mood boards. It’s important to think about the requirements for your finished space.
For example, the requirements for our home office are:
-Additional storage
-Floor to ceiling built-ins
-A desk and separate workstation
-A station for the kids to play or draw/color
-Possible coffered ceiling
-Additional overhead lights
-Concealed printer storage
Notice that we didn’t list dimensions of the built-ins, talk about the finished look or specific details like beaded face frame cabinets or dark countertops (both of which are on our wish list, but aren’t necessary for this stage of the planning). We’re aiming to get all of our requirements for this stage written down, but not get bogged down in the weeds of specifics design elements.
This biggest goal of this stage is to come out of it with a desk and built-in layout that we like so we can move forward with designing it. There are some tools you can use to make this part of the process much easier. For example, we’ve been working with a free design software called SketchUp to design the room layout. In a future post, I’ll be showing you a video on how to use SketchUp for basic room layout options.
Detailed Design
The next stage in the home remodeling process is the detailed design work. We’re going to take the layout and desk selections we made in the concept design stage and add much more detail and depth to our plans. When you’re finished with the detail design stage, you should be ready to start buying material and swinging hammers.
Some of the details we’ll need to determine in this stage of the process are:
-Built-in cabinet dimensions including finished paint or stain color as well as door style and any additional cabinet features
-Coffered ceiling design and dimensions
-Location of overhead lights
-Identify required permits
-Pick a paint color for the walls
-Develop a plan to determine the order for all the projects
-Figure out how to do each project (ex, wire an overhead light, install crown molding, etc)
You can see that there’s a lot more specific requirements as opposed to general ideas in this portion of the planning.
It can be tempting to just jump right to the detailed design work for some elements of your remodel and in some instances that may be acceptable. However, if you’re talking about a large project with a lot of interrelated portions, it’s wise to start at the beginning of the process and work your way up to the finish. By skipping steps, you’re opening yourself up to making a mistake later on. For example, if I decided to build the coffered ceiling first without taking into consideration what the finished built-in cabinets would look like, I’d probably run into issues if I took the cabinets to the ceiling. At that point I might have to make changes to the ceiling or the cabinets. Wouldn’t be fun.
If this process sounds a bit tedious and nerdy, understand that most of you are probably already following this to some extent already. If you hired a contractor to help with your kitchen remodel and you told him that you want new cabinets, the first thing he’ll probably do is ask you how many cabinets, what sizes, colors, layouts, etc. It’s unlikely that he’ll try to sell you a couple of 15″ wide stained cabinet within the first few minutes of meeting you. If he did, you probably wouldn’t hire him.
The last part of the process is pretty straight forward, it’s the Build and Installation Stage.
Build and Installation
At this stage in the process, the wheels are already in motion. I’m buying material at my local lumber supplier for my cabinets, I’ve already developed cut sheets and I’m stopping by my local township building to pickup my approved permits. There isn’t much planning going on in this stage except for daily job plans. For example, this Saturday, I’m going to accomplish X, Y and Z.
If you performed the first two steps thoroughly, this last step isn’t going to be very difficult, at least mentally.
I hope this post helped you understand how large, complex home improvement projects can be made easier through extensive planning. It can be overkill at times, but in the end it’s usually worth the effort.
Here’s where our office stands at the moment…
If you’re interested in more home office work, you can also check out our friend Colette’s latest work. She just installed hardwood flooring in her Ryan home and will be taking a similar approach to her space. Check it out!
See you next time.


